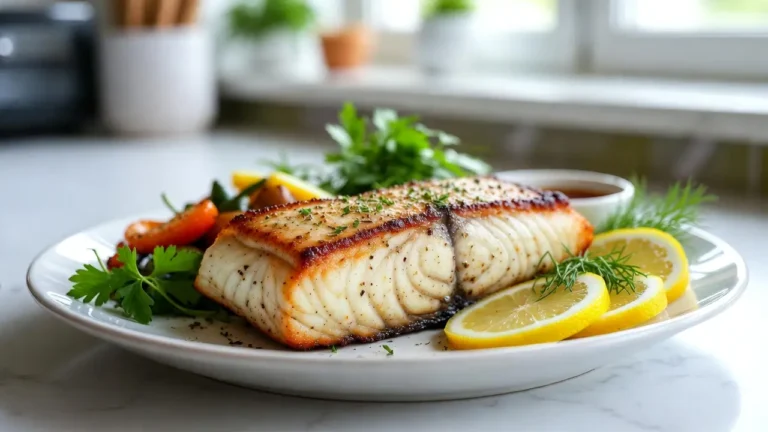
Perfect Pan Seared Halibut: Easy, Tasty & Flavorful Recipe
Cooking high-quality white fish at home can seem hard. But, learning to Pan Seared Halibut is a key skill. It makes your meals better. This method gives you a crispy outside and a soft inside.
You don’t need fancy tools to make a great dinner. By following these steps, you can impress your guests. This guide makes cooking easy and fun.
Whether it’s for a dinner party or a quick meal, this method works every time. You’ll love the Pan Seared Halibut that shows off the fresh seafood’s taste.
Key Takeaways
- Learn the essential steps to achieve a perfect golden crust on white fish.
- Discover how to keep your fillets moist and tender during the cooking process.
- Gain the confidence to prepare restaurant-quality seafood in your own kitchen.
- Understand the importance of heat control for consistent, professional results.
- Simplify complex culinary methods into easy, actionable techniques for home cooks.
Pan Seared Halibut: How to Cook Perfect Halibut at Home

How to cook perfect pan sear halibut with expert tips on choosing fresh fillets, making pan sauces, and reheating leftovers without drying out the fish.
Type:
Main Course
Cuisine:
Seafood
Keywords:
pan seared halibut, white fish recipe, seafood dinner, gourmet halibut, easy halibut recipe, pan seared fish, healthy seafood meal
Recipe Ingredients:
- Halibut fillets
- Salt
- Black pepper
- High smoke point oil (avocado oil, grapeseed oil, refined coconut oil)
- Butter
- Fresh herbs (thyme, dill, parsley, chives, tarragon)
- Lemon or lime zest
- Garlic
- Shallots
- Lemon juice / fish stock
- Olive oil
- Capers
- Heavy cream
Recipe Instructions:
Thaw frozen halibut in the refrigerator overnight. Pat the fillets completely dry with paper towels. Season lightly with salt and black pepper just before cooking. Heat a heavy skillet over high heat until hot. Add high-smoke-point oil and wait until it shimmers. Place halibut presentation-side down and do not move it. Sear until edges turn opaque and crust becomes golden brown. Lower heat and finish cooking gently. Add butter and fresh herbs at the end for flavor. Cook until internal temperature reaches about 130–135°F for juicy results. Remove fish and deglaze pan with wine, lemon juice, or stock. Add aromatics and whisk in butter to create a pan sauce. Serve with vegetables and starch of choice.
Editor's Rating:
4.5
Understanding the Qualities of High-Quality Halibut
High-quality ingredients are key to a great seared fish recipe. Starting with a premium fillet means your dish will taste amazing and feel just right. Always check your seafood before buying to ensure the best taste and texture.
Identifying Fresh Fillets at the Market
At the seafood counter, your senses are your best guides. A fresh halibut should look good and feel right. Here are some tips to help you:
- Appearance: The flesh should be firm and slightly translucent, not dull or yellowed.
- Aroma: Fresh fish smells clean and mild, not strong or “fishy”.
- Texture: When pressed gently, it should spring back, showing it’s fresh.
Wild-Caught Versus Farmed Options
Choosing between wild-caught and farmed halibut depends on your values. Wild-caught is often leaner and tastes cleaner, thanks to its natural growth. Farmed fish might be more available but can have different fat levels and environmental effects.
| Feature | Wild-Caught | Farmed |
| Flavor | Clean and mild | Rich and buttery |
| Texture | Firm and flaky | Softer and tender |
| Availability | Seasonal | Year-round |
The best choice for your seared fish recipe depends on your preferences. Whether you want the wild-caught taste or the year-round availability of farmed fish, choose the freshest you can find.
Essential Kitchen Tools for Perfect Searing
When you start cooking halibut, the quality of your gear matters a lot. The right tools help you get a perfect crust without overcooking the fish. Mastering the tools of the trade is key to your success in the kitchen.
Choosing the Right Skillet Material
For the best results, use a heavy-bottomed skillet. These pans keep heat well and prevent hot spots that can mess up your fish. Cast-iron and stainless steel are top choices for this.
A heavy pan keeps the temperature steady when you add cold fish. This is crucial for cooking halibut evenly. Look for these features in your pan:
- High heat tolerance: Make sure the handle is oven-safe if you plan to finish the fish in the oven.
- Even heat distribution: Opt for multi-clad stainless steel or well-seasoned cast iron.
- Proper size: Pick a pan that fits your fillets without overcrowding the cooking surface.
The Importance of Reliable Kitchen Thermometers
Even experienced chefs find it hard to judge doneness by sight alone. A high-quality digital thermometer makes cooking halibut easier. It lets you check the internal temperature accurately, keeping the fish moist and flaky.
Try to reach an internal temperature of 145°F for safety and texture. A thermometer helps you avoid overcooking, which can make the fish dry and chalky. Precision is the secret ingredient that makes a good home cook great.
Preparing Your Halibut Fillets for the Pan
Getting your halibut fillet ready is key to a great dish at home. Handling it carefully keeps the fish intact while searing. This step is crucial for the right texture and flavor.
Thawing Frozen Fish Safely
Thaw frozen fish in the fridge overnight for even defrosting. This method keeps the fish’s structure and moisture intact. Avoid warm water or the microwave to preserve quality.
These steps are essential for easy halibut recipes. Planning ahead ensures your ingredients are ready for cooking without losing flavor or texture.
Patting Dry for a Better Crust
Pat the fish dry with paper towels before seasoning. Moisture on the surface stops a beautiful golden-brown crust from forming. This step is vital for a crispy exterior.
After drying, the skillet’s heat can sear the fish well. This method gives your halibut fillet a crispy outside and a tender inside.
| Preparation Step | Goal | Impact on Quality |
| Slow Thawing | Maintain Moisture | High (Prevents mushy texture) |
| Surface Drying | Remove Steam | High (Ensures crispy crust) |
| Room Temp Rest | Even Cooking | Medium (Prevents cold center) |
Selecting the Best Fats and Oils for High-Heat Cooking
Getting a perfect crust on your fish starts with the right oil. High-heat cooking needs a fat that conducts heat well. This prevents sticking and ensures even browning. The wrong fat can ruin your dish with bad flavors or too much smoke
Smoke Points Explained
The smoke point is when oil starts to smoke and break down. For pan seared fish, you need an oil that can handle high heat without burning. Using oil with a low smoke point can ruin the taste of your fish.
Refined oils are top choices for searing because they’re clean and pure. Keep these oils ready for high-heat cooking:
- Avocado oil: It has a very high smoke point, perfect for intense heat.
- Grapeseed oil: It has a neutral taste that lets the fish’s flavor stand out.
- Refined coconut oil: It’s stable and adds a subtle tropical flavor.
Flavor Profiles of Butter and Oil Blends
High-smoke-point oils are great for the initial sear, but they lack flavor. Chefs often mix oils with butter for a richer taste. Starting with oil and finishing with butter creates a delicious crust without burning the butter.
This method is a game-changer for pan seared fish at home. The oil keeps the butter from burning, while the butter adds a luxurious finish. This blend makes your dish taste like it was made by a pro.
Mastering the Technique of Pan Seared Halibut
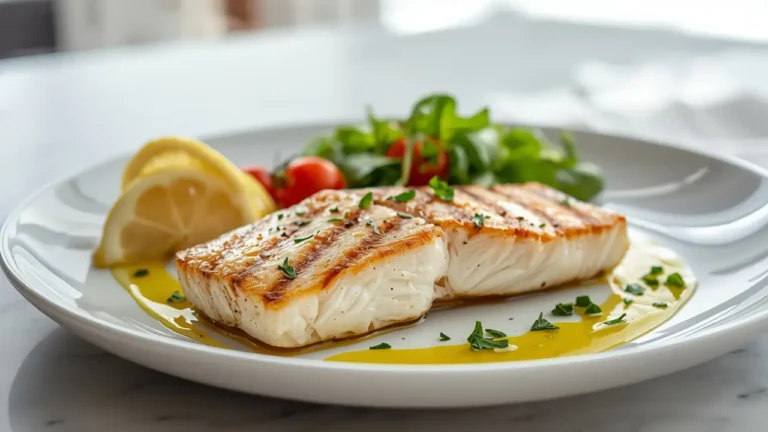
Transform a simple fillet into a culinary masterpiece with the right searing technique. When you prepare Pan Seared Halibut, aim for a beautiful, flavorful crust. Keep the inside moist and tender. This process uses the Maillard reaction, which enhances browned food’s flavor.
Achieving the Ideal Golden Crust
To get that perfect, restaurant-quality finish, resist the urge to move the fish once it hits the pan. Place the fillet in the hot oil and leave it completely undisturbed. If you flip or nudge the fish too early, you’ll break the crust and cause the delicate flesh to stick.
- Place the fillet presentation-side down first.
- Wait until the edges turn opaque before checking the bottom.
- Look for a deep, golden-brown color before attempting to flip.
“The secret to a perfect sear is patience. Let the pan do the work, and do not rush the process by moving the fish prematurely.”
Managing Heat Levels to Prevent Burning
Many home cooks struggle with heat management, often leading to a burnt exterior and raw center. To find the best way to cook halibut, start with high heat to create the crust. Then, lower the flame to finish cooking gently. This balance ensures the heat reaches the thickest part without scorching the surface.
If the pan smokes too much, your heat is too high. Adjust your burner to a medium setting for a steady, controlled temperature. Mastering this Pan Seared Halibut method will give you a consistent, delicious result every time.
Seasoning Strategies to Enhance Natural Flavors
To bring out the natural sweetness of halibut, use spices carefully. You aim to show off the clean, mild flavor of the fish. By following these steps, you can make easy halibut recipes that taste like they’re from a pro kitchen.
Simple Salt and Pepper Techniques
When seasoning, timing is key. Sprinkle salt and pepper on your fillets just before cooking. If you season too early, the fish will lose moisture and won’t sear well.
Season lightly to keep the fish’s natural taste in the spotlight. A fine sea salt and fresh black pepper are best. This simple method is key in many easy halibut recipes that focus on quality ingredients.
Using Fresh Herbs and Citrus Zest
After cooking, add fresh herbs to brighten the dish. Herbs like thyme, dill, or parsley complement the halibut’s firmness. Add them in the last minute to keep their flavor.
Citrus zest adds a refreshing touch. A sprinkle of lemon or lime zest brings a bright acidity that balances the richness. These simple touches turn a basic dish into a flavorful feast.
Determining Doneness Without Overcooking
Learning to spot when your fish is ready is key to a great meal at home. Halibut is lean and can dry out fast if cooked too long. To cook halibut well, you need to manage heat and watch closely.
Visual Cues for Flaky Texture
Check if your fillet is done by looking at it. When it’s cooked, it turns from translucent to solid white. Look for these signs to keep your fish moist:
- Opacity: The whole side should look opaque, not glassy.
- Flaking: Press the thickest part with a fork; it should flake easily.
- Resistance: It should feel soft when pressed, meaning it’s cooked right.
Internal Temperature Guidelines for Seafood
Visual checks are good, but a digital thermometer is best for consistent results. It helps avoid serving fish that’s not cooked right.
| Doneness Level | Internal Temperature | Texture Result |
| Perfectly Cooked | 145°F | Flaky and Moist |
| Overcooked | Above 150°F | Dry and Tough |
| Undercooked | Below 135°F | Rubbery or Raw |
Always check the thickest part of the fillet with your thermometer. By following these guidelines, you’ll have a safe and tasty meal every time.
Common Mistakes to Avoid When Cooking Halibut
To get a great sear on your fish, you need to avoid a few common mistakes. Even skilled cooks can struggle with searing a halibut fillet. But, most problems can be fixed with the right steps.
Preventing the Fish from Sticking
One big problem is when the fish sticks to the skillet. To avoid this, make sure your pan is hot before adding oil or butter. A cold pan will make the fish stick to it, ruining the crust.
Wait until your oil shimmers or reaches the right smoke point. When you put the fish in, don’t move it right away. Let it sear properly, and it will release from the pan.
Avoiding Overcrowding the Pan
Another mistake is putting too much fish in the skillet at once. Overcrowding lowers the pan’s temperature, making it hard to get a good sear. This leads to a steamed, not seared, halibut fillet.
Steaming makes the fish rubbery instead of flaky. Cook in batches to keep the heat up. This simple trick helps you get better results every time.
| Common Mistake | Resulting Issue | Corrective Action |
| Cold Pan | Fish sticks to surface | Preheat until oil shimmers |
| Overcrowding | Steaming instead of searing | Cook in smaller batches |
| Early Flipping | Broken, uneven crust | Wait for natural release |
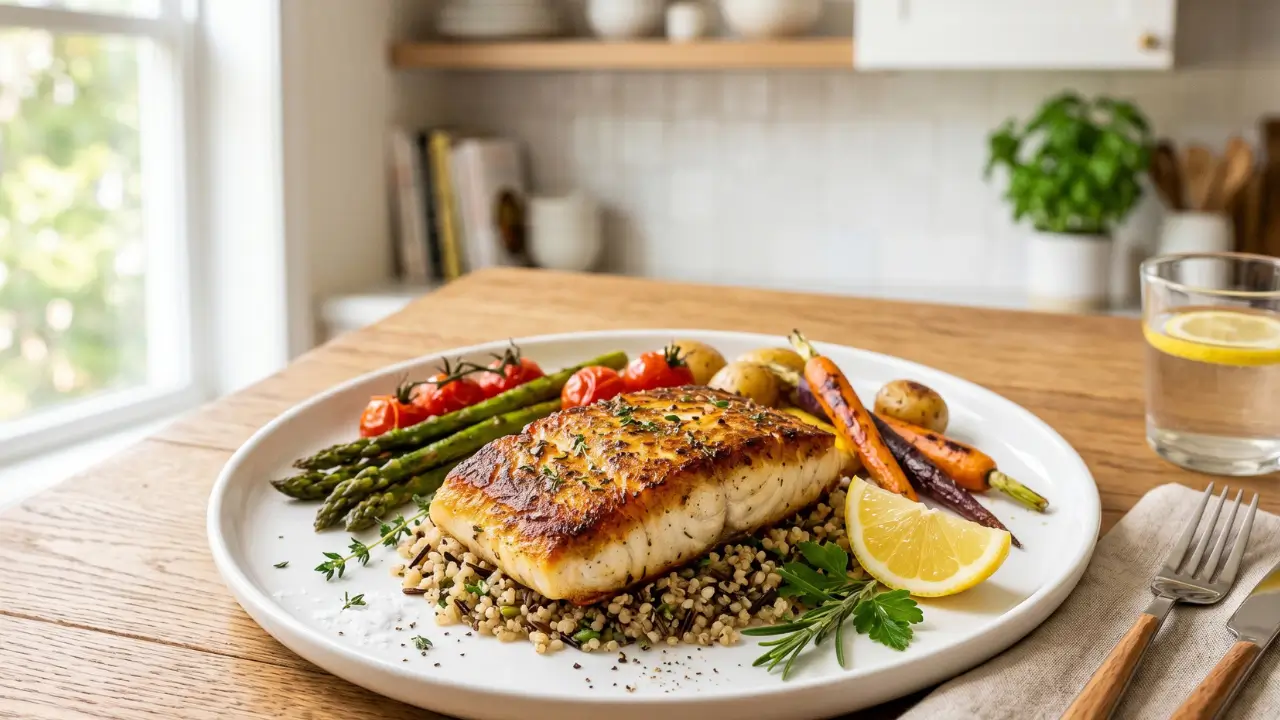
Pairing Your Halibut with Complementary Sides
Creating the perfect dish means choosing sides that match the light, flaky halibut. You want the fish to be the main attraction while still offering a full dining experience. It’s all about finding the right pairings for seafood dinner ideas that impress everyone at your table.
“The secret of a good meal is the harmony between the main ingredient and its companions on the plate.”
Light Vegetable Accompaniments
For a meal that’s fresh and lively, pick vegetables with a crisp texture and bright colors. Try sautéed asparagus with garlic for a delicate crunch that contrasts well with the fish. Roasted cherry tomatoes add a sweet and tangy flavor that balances the richness of the sear.
These veggies not only make your dish healthier but also look great. Steaming snap peas or blanching baby carrots keeps them bright. Simple preparation lets the natural flavors of the veggies shine with your perfectly cooked fish.
Starch Options for a Balanced Meal
A complete meal needs a hearty starch for a satisfying finish. For a healthy option, try a fluffy quinoa salad with fresh herbs and a light vinaigrette. The nutty taste of the grain goes well with the mild halibut.
For a richer experience, a creamy lemon-herb risotto adds a luxurious mouthfeel that complements the fish. The citrus in the rice connects the savory sear with the delicate fish. This balance makes your meal both cohesive and impressive.
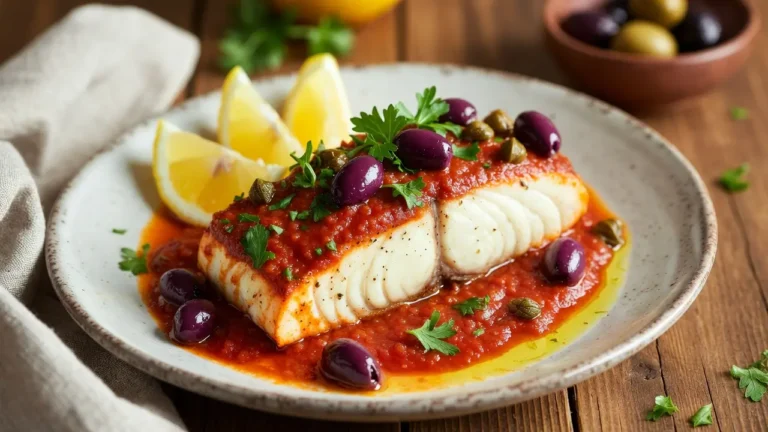
Creating Gourmet Pan Sauces in the Same Pan
The secret to a restaurant-quality meal often hides in the bottom of your skillet. After you finish searing your fish, those browned bits—known as fond—contain concentrated flavor. It’s far too valuable to discard. Learning to utilize these drippings is truly the best way to cook halibut if you want to impress your guests.
Deglazing Techniques for Flavor
Deglazing is a simple process that lifts the caramelized proteins from the pan surface. Once you remove the fish, pour a small amount of liquid into the hot skillet. You can use dry white wine, fresh lemon juice, or a high-quality fish stock to create the base of your sauce.
Use a wooden spoon to gently scrape the bottom of the pan while the liquid bubbles. This action releases the fond, which immediately enriches your sauce with deep, savory notes. Allow the liquid to reduce by half to concentrate the flavors before adding your final ingredients.
Incorporating Aromatics and Liquids
To build layers of complexity, introduce aromatics like minced shallots or garlic into the pan after deglazing. Sauté them briefly until they soften, then whisk in a knob of cold butter to give the sauce a velvety, glossy finish. Fresh herbs such as parsley, chives, or tarragon add a bright, aromatic lift that balances the richness of the fish.
By following these steps, you transform a simple fillet into a sophisticated gourmet halibut dish. This technique requires minimal effort but provides a professional touch that elevates your entire meal. Refer to the table below for classic flavor combinations to try with your next batch of fish.
| Sauce Base | Aromatics | Finishing Touch |
| Dry White Wine | Shallots & Garlic | Cold Butter & Parsley |
| Lemon Juice | Capers & Shallots | Olive Oil & Dill |
| Fish Stock | Leeks & Thyme | Heavy Cream & Chives |


Safety and Storage Tips for Leftover Seafood
Managing leftovers is key to not wasting your kitchen efforts. When you make a gourmet halibut dish, you want to keep its taste and texture. Proper handling after the meal is crucial for enjoying leftovers the next day.
Proper Refrigeration Methods
To keep fish fresh, limit its air exposure. Oxidation harms cooked seafood, causing flavor loss and quality changes. Always put your pan seared fish in an airtight container before refrigerating.
Make sure the container is sealed well to keep fridge odors out. It’s best to eat your leftovers within two days for the best taste. Keeping your fridge at or below 40°F is essential for food safety.
Reheating Without Drying Out the Fish
Reheating seafood needs a gentle approach to avoid drying it out. High heat or the microwave can cook it unevenly. Instead, use low heat to warm your pan seared fish slowly.
Place the fillets in a skillet over low heat with a bit of water or broth. This method keeps moisture in, making your gourmet halibut dish tender and flaky. Follow these guidelines to manage your leftovers well.
| Storage Method | Temperature | Maximum Time |
| Airtight Container | Below 40°F | 48 Hours |
| Vacuum Sealed | Below 40°F | 72 Hours |
| Gentle Reheat | Low Heat | 5-7 Minutes |

Conclusion
Learning to pan-sear is easy and brings top-notch flavors to your kitchen. Now, you can turn simple fillets into a dish that wows everyone.
Using the best ingredients and controlling the heat is key. These skills let you create many seafood dishes for any event.
Try new herbs and sides to keep your meals fresh. Making healthy, tasty meals becomes fun and rewarding.
Share your cooking with loved ones to share the joy. Your path to becoming a skilled home chef begins with your next meal.
FAQ
Why is pan-searing considered the best way to cook halibut?
Pan-searing is top-notch because it makes halibut taste like a gourmet dish. It creates a crispy, golden crust while keeping the inside moist. This method uses the Maillard reaction to turn a simple halibut fillet into a meal fit for a restaurant.
How can you identify the highest quality halibut fillet at the market?
Look for fresh fillets that are firm and translucent. They should have a clean, ocean smell. Stay away from dull-looking fish or anything with a strong smell. Freshness is key, whether it’s wild-caught or farmed.
Why is it necessary to pat the fish dry before it hits the pan?
Moisture ruins a good sear. Damp fish steams instead of browning. Dry the fish with a paper towel to let the hot oil crisp it up right away.
What are the best oils to use for cooking halibut at high temperatures?
Choose oils with high smoke points to avoid burning. Avocado oil and grapeseed oil are great. Adding a bit of Kerrygold butter during cooking adds a rich, nutty flavor.
How do you prevent your pan seared halibut from sticking to the skillet?
Use a well-heated skillet and be patient. A heavy pan like a Lodge cast-iron or stainless steel All-Clad works best. Wait for the oil to shimmer before adding the fish. Let it cook undisturbed until it releases from the pan.
What internal temperature should you aim for to avoid overcooking?
Halibut dries out fast because it’s lean. Use a thermometer like a Thermapen to cook it to 130°F to 135°F. This keeps it flaky and juicy.
Can you suggest some seafood dinner ideas to pair with this dish?
Pair your fish with light, fresh sides. Try sautéed asparagus, roasted cherry tomatoes, or lemon-herb quinoa. These sides add nutrition without overpowering the fish’s flavor.
How do you make a professional pan sauce for a gourmet halibut dish?
After removing the fish, deglaze the pan with white wine or lemon juice. Scrape up the browned bits, then whisk in cold butter and herbs like chives or dill. This creates a silky sauce that enhances the meal.
What is the best method for reheating leftover pan seared halibut?
Avoid microwaving to keep the fish moist. Reheat it gently in a skillet with a little water or broth. Cover the pan to trap the steam. This method keeps the fish moist and flavorful for a second meal.
Did You Try This Recipe ?
There are no reviews yet. Be the first one to write one.