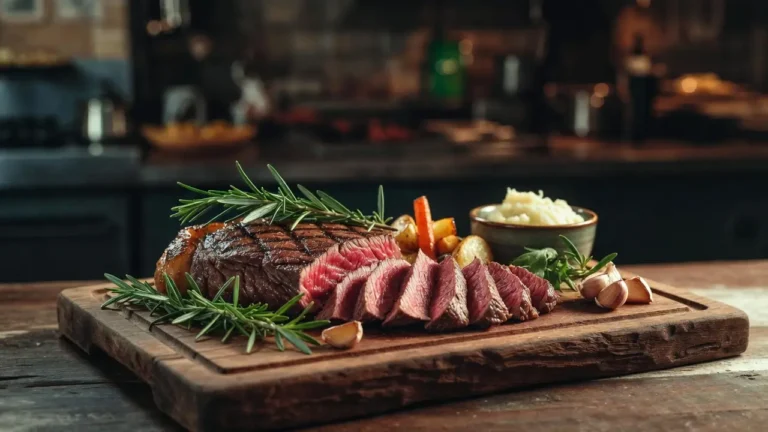
Delicious Corned Beef Recipe: Easy to Make at Home
Turning your kitchen into a gourmet deli is a rewarding experience. It brings professional quality to your table. Mastering this Corned Beef Recipe lets you control every ingredient. This ensures your family enjoys a meal without harsh preservatives found in store-bought options.
You might think curing meat at home is hard. But this easy corned beef recipe makes it simple for anyone. By following these steps, you can create a savory centerpiece for any festive gathering.
Preparing your own meat gives you a sense of accomplishment. This delicious corned beef recipe is a great start for learning traditional curing techniques. Get ready to impress your guests with a dish that tastes better than anything from the local market.
Table of Contents
Key Takeaways
- Learn the basics of curing meat at home with simple techniques.
- Avoid unnecessary additives and preservatives by choosing your own ingredients.
- Build culinary confidence by mastering a classic dish that’s perfect for holidays.
- Save money while making restaurant-quality food in your own kitchen.
- Create memorable family meals that show your dedication to fresh, homemade food.
Homemade Corned Beef Recipe: Easy Step-by-Step Guide
How to make homemade corned beef from scratch with an easy step-by-step curing and cooking guide. Tender, flavorful, and perfect for family meals or holidays.
Type: Main Course
Cuisine: American / Irish-American
Keywords: corned beef recipe, homemade deli meat, cured brisket, St Patrick’s Day, holiday dinner, slow cooker corned beef, comfort food
Recipe Yield: 6 servings
Calories: 450 calories per serving (optional estimate)
Preparation Time: PT45M
Cooking Time: PT4H
Total Time: PT4H45M
Recipe Ingredients:
- Beef brisket
- Water
- Salt
- Sugar
- Pink curing salt (Prague Powder #1)
- Mustard seeds
- Coriander seeds
- Bay leaves
- Whole peppercorns
- Pickling spices
- Potatoes
- Carrots
- Cabbage
Recipe Instructions: Prepare the brine by dissolving salt and sugar in warm water and letting it cool. Toast mustard seeds, coriander seeds, peppercorns, and bay leaves, then add to the brine. Submerge the brisket completely in the brine and refrigerate 5–7 days. Keep the meat fully submerged and maintain fridge temperature between 35–40°F (2–4°C). After curing, rinse the brisket under cold water to remove excess salt. Trim fat to about 1/4 inch thickness. Place brisket in a pot and cover with water and aromatics. Simmer gently for several hours until fork-tender. Add potatoes and carrots during the last hour of cooking. Add cabbage wedges during the last 20–30 minutes. Remove meat and let rest 15 minutes before slicing. Slice against the grain and serve with vegetables.
4.9
Understanding the Art of Curing Beef
To learn how to make corned beef, you need to grasp the magic of the brine. It’s not just about adding flavor. It’s a precise chemical reaction that changes the meat’s structure.
The Science Behind the Brine
Curing uses osmosis to preserve and season the beef. When you soak the meat in a salt-based solution, the salt pulls moisture out of the fibers. At the same time, it brings flavorful brine back into the meat.
This delicate exchange makes sure the seasoning goes deep into the meat. By controlling this, you create a stable product. It gets a signature pink color and a tender, savory taste.
Selecting the Right Cut of Beef
Picking the right meat is key when making corned beef. The brisket is the traditional choice. It has the right mix of connective tissue and muscle.
Choose a cut with proper fat marbling throughout. This fat helps keep the meat juicy during cooking. It prevents it from becoming dry or stringy.
Opting for a high-quality brisket lets the salt and spices work their magic. A well-marbled piece of beef will always give you tender and flavorful results.
Essential Ingredients for Your Homemade Corned Beef
Creating delicious homemade corned beef starts with the right pantry items. Choose fresh, top-quality ingredients for a safe and flavorful dish. This ensures your homemade corned beef turns out great.
Choosing Quality Spices and Aromatics
The key to a rich flavor is in your choice of spices. Using whole spices gives a vibrant and aromatic taste that’s unmatched.
Make sure to include these must-haves in your brine:
- Mustard seeds for a sharp, tangy bite.
- Coriander seeds to add a subtle, citrusy warmth.
- Bay leaves to provide an earthy, herbal backbone.
- Whole peppercorns for a necessary touch of heat.
The Role of Pink Curing Salt
Another crucial ingredient is pink curing salt, also known as Prague Powder #1. It’s absolutely critical for making homemade corned beef.
This salt contains sodium nitrite. It stops harmful bacteria like botulism from growing. It also keeps the meat a signature pink hue. Always use it carefully, as it’s for curing, not seasoning.
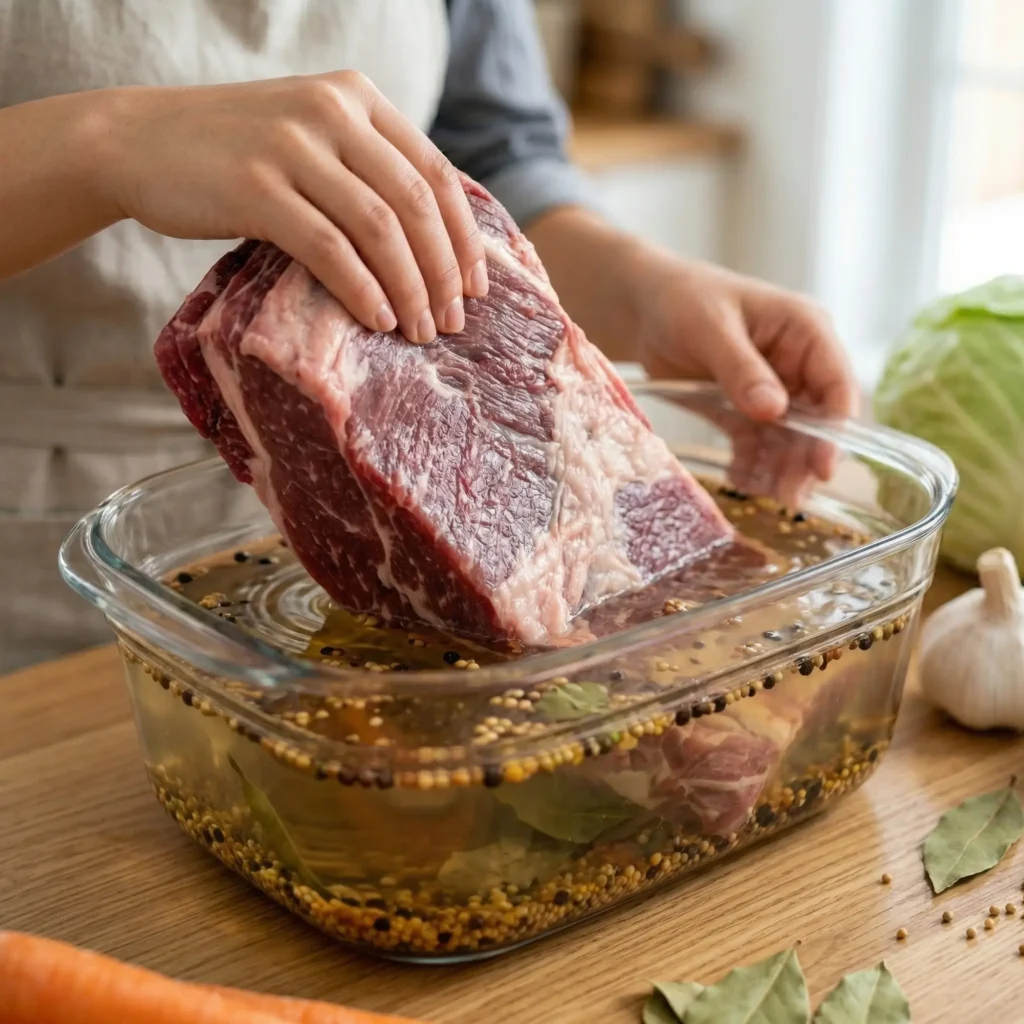
Preparing Your Brine Solution
Mixing the perfect curing liquid is the first step to making top-notch homemade corned beef. This liquid is key to seasoning every part of the meat. It helps the cure spread evenly, making the texture consistent.
Mixing the Salt and Sugar Base
First, dissolve salt and sugar in warm water. Make sure the water is cool before adding the meat. The right mix of these ingredients gives your homemade corned beef its unique taste.
Stir until the water is clear. This ensures no salt crystals are left to disrupt the curing. Now, your brine is ready for the next step in flavor.
Infusing Flavors with Pickling Spices
To get a rich flavor, toast your spices lightly before adding them to the brine. This step releases essential oils that boost the aroma and taste.
For the best homemade corned beef, use high-quality spices. You can mix in classic ingredients like:
- Mustard seeds for a tangy kick.
- Whole peppercorns for a subtle heat.
- Bay leaves for a fragrant herbal note.
- Coriander seeds for a citrusy finish.
After toasting, add these spices to your cooled brine. This way, every piece of beef is seasoned perfectly.
The Curing Process Explained
Patience is key when making a delicious corned beef recipe. The brine prep is quick, but curing takes days. This time lets the salt and spices soak into the meat.
Maintaining Proper Temperature and Environment
For safe curing, keep the meat in a controlled space. Your fridge is the best place, as it keeps the brisket at a safe temperature.
Here’s how to keep the curing environment perfect:
- Keep your fridge between 35°F and 40°F always.
- Make sure the meat stays completely submerged in the brine.
- Use a non-reactive container, like glass or food-grade plastic, to avoid metallic tastes.
How Long to Cure Your Beef
The cure time depends on the brisket’s size and thickness. Most cuts need at least five days for flavor and texture.
Thicker cuts might need up to seven days. Consistency is key for a tasty and safe corned beef. By keeping the environment stable, every slice will be perfectly cured.
Preparing the Meat for Cooking
To make your cured brisket tender, start with surface prep. After curing, the meat has a lot of salt on it. Cleaning it well keeps your dish from being too salty.
Rinsing and Cleaning the Brined Beef
First, take the brisket out of its container and throw away the brine. Then, rinse it under cold running water in your sink. Rub the meat gently to remove pickling spices and extra salt.
This rinse is key to control salt in your meal. Without it, salt can soak into the meat while it cooks. After rinsing, dry the brisket with paper towels for the next step.
Trimming Excess Fat for Better Texture
A bit of fat makes the meat moist, but too much can cause uneven cooking. Use a sharp knife to cut the fat layer to about 1/4 inch. This strategic trimming helps heat reach the meat evenly.
Less fat also makes the meat less greasy and easier to slice. Try to make the surface even so the brisket cooks well.
| Preparation Step | Primary Goal | Expected Outcome |
| Cold Water Rinse | Remove surface salt | Balanced flavor profile |
| Fat Cap Trimming | Ensure even heat | Improved meat texture |
| Surface Drying | Remove moisture | Better seasoning adhesion |
Choosing Your Cooking Method
Choosing the right cooking method depends on your schedule and kitchen tools. Whether it’s a quick easy corned beef recipe for a busy weeknight or a slow-cooked feast for the weekend, your choice affects the meat’s texture.
Stovetop Simmering Techniques
Stovetop simmering is a classic choice for many. It lets you closely monitor the liquid levels, keeping the brisket in flavorful broth.
Keeping the heat low and steady prevents the meat from getting tough. You can adjust the aromatics or add water if needed, during the long cooking time.
Slow Cooker Corned Beef Recipe Advantages
For a hands-off experience, try a slow cooker corned beef recipe. It cooks at low heat, making the meat incredibly tender and easy to shred.
“Patience is the secret ingredient in any great braised dish; the longer the meat rests in its own juices, the more profound the flavor becomes.”
The table below helps you choose the best method for your needs:
| Feature | Stovetop Simmering | Slow Cooker |
| Active Time | High (Requires monitoring) | Low (Set and forget) |
| Cooking Speed | Moderate | Slow |
| Texture Result | Firm and sliceable | Very tender |
| Best For | Traditionalists | Busy schedules |
Mastering the Traditional Corned Beef Recipe
Getting the right texture is key in a traditional corned beef recipe. It’s all about managing heat to turn tough meat into a juicy, tasty dish.
Achieving the Perfect Tenderness
The trick is to use low and slow heat. This breaks down the meat’s tough parts. As it cooks, the collagen melts, making the meat soft and buttery, just like a deli.
Don’t try to hurry it with high heat. A traditional corned beef recipe needs patience. A slow simmer keeps the meat moist and tender.
Testing for Doneness
Check if your meal is done with the fork-tender test. Stick a fork into the thickest part of the brisket. If it goes in easily, it’s ready.
Watch out not to overcook it. Overcooking makes the beef dry and stringy. Keep an eye on it towards the end to get a delicious Corned Beef Recipe your family will enjoy.
Adding Classic Vegetables and Sides
A classic corned beef recipe is even better with the right sides. These sides offer a nice contrast to the meat’s rich flavor. They help make a meal that’s both hearty and satisfying for the whole family.
“The secret to a perfect meal lies in the harmony of textures and the depth of flavor found in simple, slow-cooked ingredients.”
Selecting Potatoes and Carrots
Timing is key when cooking root vegetables. You want them tender but not mushy. Add them in the last hour to keep them firm.
Here are some tips for great results:
- Go for waxy potatoes like Yukon Gold for better texture.
- Cut carrots into big chunks so they cook evenly with potatoes.
- Make sure the veggies stay covered in the cooking liquid to soak up the meat’s flavors.
Preparing Cabbage for the Best Flavor
Cabbage is a perfect match for this dish, but it needs careful cooking. Slice it into thick wedges instead of shredding. This way, the leaves stay together and soak up the broth’s flavors.
Put the wedges on top of the meat for the last 20 to 30 minutes. This makes the cabbage tender and sweet, with a bit of crunch. This method ensures every bite is perfectly balanced and tasty.
Tips for the Best Corned Beef Recipe Results
Getting a professional-looking meal starts with how you treat the beef after it’s cooked. The cooking process is key, but the final steps are what really matter. They decide the texture and moisture of your dish. Follow these simple tips to get the best corned beef recipe results at home.
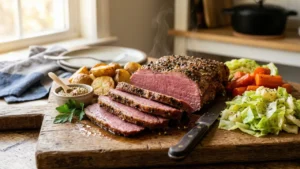
Slicing Against the Grain
After cooking, look at the meat’s surface to find the muscle fibers. Slice across these lines, not with them. This makes the meat tender and easy to chew.
Using a sharp knife is crucial for clean slices. Cutting with the grain makes the meat tough and stringy. Always check the grain before you start slicing.
Resting the Meat Before Serving
Patience is key when cooking high-quality beef. Let the meat rest on a cutting board for at least 15 minutes before carving. This lets the juices spread evenly, making each slice succulent and flavorful.
Carving too soon lets juices spill out, not stay in the meat. Resting is essential for the best corned beef recipe every time. Here’s how different actions affect your dish:
| Technique | Primary Benefit | Impact on Texture |
| Slicing Against Grain | Improved tenderness | Soft and easy to chew |
| Resting 15 Minutes | Juice retention | Moist and flavorful |
| Using Sharp Knife | Clean presentation | Uniform, professional slices |

Creative Ways to Use Leftover Corned Beef
Preparing a large brisket is rewarding because you can make many tasty meals with leftovers. You don’t have to waste your effort after the main meal. By using your classic corned beef recipe again, you can enjoy delicious flavors for days.
Making Classic Reuben Sandwiches
The Reuben is a top choice for using leftover meat. Begin with two slices of good rye bread. Add lots of thinly sliced beef, tangy sauerkraut, and a slice of Swiss cheese.
Grill the sandwich in a buttered skillet until it’s golden and the cheese melts. This makes the bread crispy and the meat tender. Serve it warm with Russian dressing for a real deli taste at home.
Incorporating Beef into Breakfast Hashes
For a hearty breakfast, turn leftovers into a savory hash. Dice the meat into small cubes and mix with chopped potatoes and onions in a hot pan. Cook until the potatoes are soft and the beef edges are delightfully caramelized.
You can add bell peppers or a fried egg to make it your own. This way, your classic corned beef recipe keeps giving you satisfying meals. It’s a smart way to use every bit of your cooking effort.
Common Mistakes to Avoid When Making Corned Beef
When you first try a traditional corned beef recipe, you might hit some bumps. Even seasoned cooks can face issues when they first make how to make corned beef. Knowing these common problems can help you improve your skills and get great results.
Preventing Over-Salting
One big problem is when your corned beef tastes too salty. This often happens if it cures for too long or if the brine is too strong. Proper rinsing is key to get rid of the extra salt before cooking.
To avoid too much salt, soak the brisket in cold water for hours before cooking. Change the water a few times to remove extra sodium. This trick helps you control the flavor of your traditional corned beef recipe.
Avoiding Tough or Chewy Meat
Getting the right texture is as important as the flavor. Many think cooking it fast is best, but high heat makes the meat tough. You need to simmer it gently and steadily to make it tender.
When you learn how to make corned beef, remember to be patient. If the water boils too hard, the meat will get tough. Keep the heat low and steady for a tender, melt-in-your-mouth texture every time.

Conclusion
Making a meal from scratch is incredibly fulfilling. You now know how to turn a simple brisket into a delicious main dish for your family.
Whether you pick the slow cooker corned beef recipe for easy cooking or the stovetop method for a traditional taste, your hard work pays off. This process of curing and seasoning boosts your cooking skills to a pro level.
Now, you can share this amazing corned beef recipe with your loved ones. Get your ingredients ready and start your next cooking adventure with confidence. Your hard work will create a meal that everyone will remember.
Try out different spice mixes to make the flavor your own. Keep notes on your favorite changes to get even better at cooking. Your kitchen is where you can create lasting traditions with delicious food.
FAQ
Why is a homemade corned beef recipe better than buying a pre-packaged version?
Making your own homemade corned beef lets you control what goes into it. You avoid artificial preservatives found in store-bought versions. An easy corned beef recipe at home gives you a fresher taste that suits your family’s taste.
What is the best cut of meat to use for a traditional corned beef recipe?
For the best corned beef recipe, choose a beef brisket. Look for one with even fat marbling. This keeps the meat moist during curing and simmering.
What is the purpose of pink curing salt in a delicious corned beef recipe?
A: Pink curing salt, like Prague Powder #1, is key for safety and looks. It stops bacteria growth and gives the meat its pink color, making it a classic corned beef recipe.
How long should I cure the meat when learning how to make corned beef?
For a delicious corned beef recipe, cure the brisket for five to seven days. This lets the salt and spices fully soak into the meat.
Can I use a slow cooker for this dish, and what are the benefits?
Yes, a slow cooker corned beef recipe is great. It uses a Crock-Pot for a “set it and forget it” meal. The low heat makes the meat tender with little effort.
Why do I need to rinse the brisket before I begin the cooking process?
Rinsing the meat under cold water removes excess salt from brining. Skipping this can make the dish too salty. So, rinse well to keep your traditional corned beef recipe balanced.
How do I know when my corned beef is perfectly cooked?
Check for doneness by inserting a meat fork into the thickest part. If it slides in and out easily, it’s ready. This traditional corned beef recipe should be tender but not stringy.
What is the secret to slicing the meat for the best texture?
To make the meat tender, slice against the grain. Cutting across the fibers makes it easier to chew. Also, let your homemade corned beef rest for 15 minutes before carving to keep juices in.
What are the traditional vegetables to serve with a classic corned beef recipe?
Serve with potatoes, carrots, and cabbage for authenticity. Add root vegetables near the end of cooking and cabbage last to keep them flavorful without getting mushy.
How can I use leftovers from my delicious corned beef recipe?
Leftovers are great for other meals. Make a Reuben sandwich with Boar’s Head Swiss cheese and sauerkraut on rye. Or, chop the meat into a hearty breakfast hash with crispy potatoes and onions.
How do I avoid making the meat too tough or chewy?
Avoid boiling the meat too hard. Keep the liquid at a gentle simmer. High heat toughens the meat, while low heat makes it tender.
Did You Try This Recipe ?
There are no reviews yet. Be the first one to write one.